GA4 is a web analytics platform which helps businesses see and adapt to user behavior on their websites and apps. GA4, formerly known as the Google App + Web property, is the updated version of older analytics programs viz. Universal Analytics.
As a program, GA4 is a lot different than its predecessors in Google Analytics. Therefore, using the new version in conjunction with earlier versions may be the best strategy for getting used to the newer functions.
In this blog, we are going to break down the ways a business can add a GA4 property to a site/app that already uses analytics or a brand new property for a business with no background in analytics. For both cases, you can use Google Tag Manager as a way to facilitate installing and setting up your new GA4 property.
How to Add a Google Analytics 4 Property to a Site or App That Already Uses Analytics
If you are looking to install and use GA4, chances are you may already have a working Google Analytics property. You and your team could be using Universal Analytics for example. Even if you want to create a new property with GA4, you don’t need to immediately drop your other Analytics property. A common option, especially for those who still need time to get used to the new interface and functions of GA4, is to create a GA4 property that collects the same data as your other UA or Google Analytics property. These properties are linked with your website or app in order to collect data on user behavior.
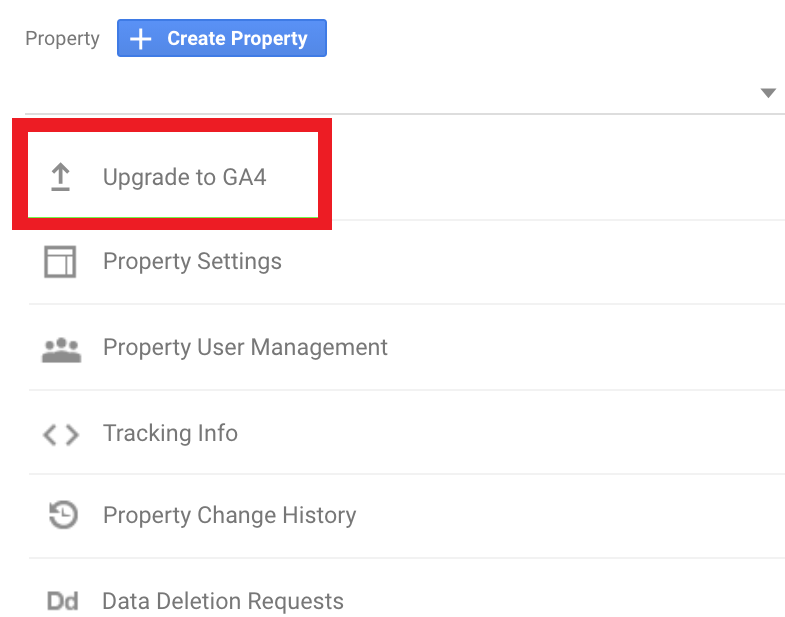
The GA4 Setup Assistant is a tool within Google Analytics that can help you install and set up GA4 to match the data collection of your existing GA property. If you are using UA, you may have an “Upgrade to GA4”
button available to you. If so, click it, and if not, here is a step-by-step look at upgrading GA4:
-
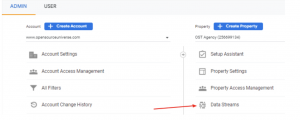
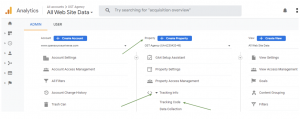
- Go to the Admin tab on the screen of your Google Analytics screen (the Admin tab should be visible on Universal Analytics too).
- Select your existing account from the “Accounts” tab.
- In the “Property” column, select your currently existing Universal Analytics property.
- This is where the GA4 Setup Assistant comes into play – under the “Property” column, click on the “GA4 Setup Assistant” option.
- Then click on ‘Get Started button’ (blue color) to initiate the setup process.

- Select the “Tag Installation” option on the screen.

- Select your web data stream.

- Setup your Web Stream; enter website url & stream name.

- Right below the “Tagging Instructions” option, select “Use existing on-page tag”.
- Select the “Google Tag Manager” button, which should result in a drop-down menu. You should now see a guide to setting up a tag to track website data. This tag will collect data for your new GA4 property via Google Tags Manager.
- You will see your measurement ID – to remember this ID number, you may want to write it down in your notes.

- On your Google Tags Manager account, click the “New Tag” link.
- You will now name your new tag. Because you are linking your GA properties, you might want to name the tag “GA4 Tracking.” You can add “all tags” to the end of the name too.
- Under “Tag Type,” select “Google Analytics, GA4 Configuration”.

- Input your previously noted measurement ID into the “Measurement ID” box.

- Set the tag trigger so that it fires on all pages.
- Press the “Save” option on your screen.
- Select the “Preview” option on the upper-right hand area of your screen.
- The “Preview Mode” window should open now in a new tab on your browser. If you don’t see this preview mode window open, your browser and/or your ad guard may be blocking the window from opening.
- If you see your tag, which you may have named “GA4 Tracking – all tags,” under the “Tags Fired” section of the screen, then your tag should be firing properly.
- Go back to your Google Tag Manager account, and click the “Submit” option.
- Name the current version, and when you are ready select the “Publish” option.
- To test the status of your account and tags, go to your website. Click a few buttons and navigate through different pages.
- Go back to your GA4 account, and press the “+” or cross-shaped button beside the “Web Stream details” button.
- Select the “Real-time” button to view your real-time report. You should be able to see data being gathered real-time in the report.
Note: If you make a new GA4 property from within an existing Google Analytics or Universal Analytics property, the new GA4 property becomes the new default option.
If you create a new property in this way, you can easily collect data in both GA4 and your previous analytics program like UA.
Set up a New Analytics Profile for a Website and/or an App (GA4)
In order to start using GA4 from scratch, you first need to create a property/account. You can start by visiting the Google Marketing platform. To create an account, you can simply click the “Get started today” option.
1. Set up Analytics on your website and/or app.
2. Write the name of your Account in the “Account Name” bar. For now you can leave all of the check boxes checked (unless you need to restrict your Account).
3. Write the name of your Property under Property Name, and your time zone and your local currency in the given spaces below.
4. On the final setup page, you will be asked to specify the size of your business, as well as what you intend to use GA4 for.

Once you set up your account, you can create tags and data streams for your account in order to monitor the activity of users on your business’s given app or website.
Your Data Stream
GA4 properties collect user data from websites and apps through data streams. In order to make a data stream, and link your website to GA, press the “Web” button in your GA4 window. After pressing “Web,” input your website’s URL as well as an appropriate name for the data stream.
When you are ready, press the “Create Stream” option.
Once you have created your data stream, you must then install it onto your website to enable data collection. If you need help installing GA, thankfully Google Tag Manager can help you do so!
Installing GA4 with Google Tag Manager – an Option for New and Existing Analytics Users
If you have installed Universal Analytics through gtag.js, some data should automatically be transferred to your GA4 property. However, if you use Google Tag Manager (which I use as well), you still have a few steps to complete before you’re off and running.
-
- Under “Setup Assistant,” which you should see in Tags Manager, select the “Tag Installation” option.
- Afterwards select the data stream you see – the program will automatically generate this data stream when you upgrade from your UA property. You should see the following window:
- In the upper-right hand corner of the screen, you should see your new property’s tracking/Measurement ID. After recording this ID in your notes, proceed.
- Go to your Google Tags Manager container, select the “Tags” button, then select “New.” Choose “GA4 configuration.”
- Input the Measurement ID you recorded earlier into the “Measurement ID” box.
- When your configuration loads, you will see a list of “Events.” If you want to monitor page views automatically, keep the “Send a page view” Event * Note: it is usually fine to keep the “Send a page view” Event enabled, but in certain cases you may want to disable the page view checkbox, and instead make a separate configuration tag.
- Under “Triggering,” press the “All Pages” option, then give the tag a unique name.
- In order to see if your new GA4 property is receiving data, enable “Preview Mode” and test your changes
- In the “Preview Mode” window, you will hopefully see your new GA4 tag among the other tags that are firing.
- Return to your GA4 window, and select “Real-time” on the sidebar on the left hand side of your screen.
- If you are clicking around your website, you should be able to see your own actions in the real-time generated reports.
*A quick note: right now, the real-time reports have some bugs/glitches, and they may take time to start generating properly. When I tested out my GA4 on my website, the GA4 configuration fired and the tag sent a page view. I could see the page view in the real-time reports, but the user count still displayed “0.”
Once given a few minutes, the real-time reports showed me, and the amount of users in the past 30 minutes went up to “1.” In another case I waited around 15 minutes before GA4 started collecting data visibly. When you create a new property, you may need to give it some time before it starts properly working. Properties that are 1+ days old usually work fine. - Once you’re ready, hit “Publish!” By creating your GA4 tag and testing it in real-time reports, you can officially publish. In the upper-right hand corner of your Google Tags Manager window, select the “Submit” button.
Congratulations, you now have a working GA4 property which is collecting data.
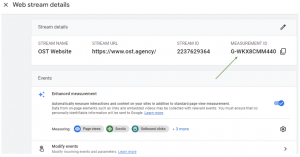
Note: Your program will run “Enhanced Measurement” by default, meaning GA4 will record data from actions like link-clicking, scrolling, searches, and so forth. You may want to customize some of the features within “Enhanced Measurement,” so be sure to double-check it.
- Once you have your property, you can “Create Data Streams” in order to create the streams you want to implement on your website.
- Once you create the stream, you will then have your Measurement ID.
If you are finding the information too technical and complex, you can seek Google Analytics Consultation from the best digital marketing company near you.
Without using Google Tag Manager, GA4 tracking code can be added in 3 different ways to your website.
1). It can be easily upgraded by copying and pasting the GA4 tracking code script in the section of your website Follow these steps:
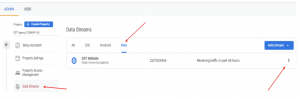
i) Start the process by clicking the “Admin” button appearing in the left bottom corner of your GA4 screen.
ii) Under Property, click on the “Data Streams” option, then select the “Web”out of 4 choices. Next press on the arrow (>) to land on “Web Stream Details” page.
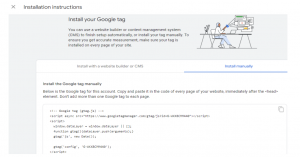
iii) Now, you will see a left sliding window opening with title ‘Web stream details’, then scroll down and click on “View Tag Instructions” under Google Tag. Next again a new left sliding window will appear and in “Installation instructions”, please go with ‘Install manually’ choice.

iv) Finally follow this simple instruction by Google written over there:
“Copy and paste it in the code of every page of your website, immediately after theelement. Don’t add more than one Google tag to each page.”
v) In maximum 1-2 days, you will see the website data flowing to your New version of Analytics, GA4.
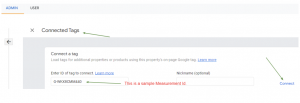
2). You can also connect your existing UA Property in Google Analytics to GA4 using Measurement ID
Simply, put the GA4 Measurement ID inside ‘Connected Tags’ option under Property in older version of Analytics, i.e. UA.
Follow the steps below:
a) Press the “Admin” placed on the left bottom corner.
b) Click the “Data Streams” and select “Web”
c) Press the arrow (>) under “Data Stream” to land on the “Web Stream Details” page.
d) Copy this GA4 ‘Measurement ID’ present on the top right corner.
e) Now go to your existing UA Property, then click on Admin >> Tracking info (under Property) >>Tracking code
f) Go down and select the option “Connected Site Tags”
![]()
g) Paste the Measurement ID inside ‘Enter ID of tag to connect’ under Connected Tags.
h) Now, don’t wait to click on the “Connect” button to link Universal Analytics property and GA4 property.
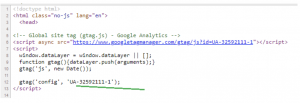
3). UA can also be upgraded to the latest tag i.e. GA4 by adding a new ‘Config’ directive in the existing code of the website
This is another very popular method that you can use if you already have a (gtag.js) analytics code on the website and you want to add GA4 Measurement ID to your site. By adding a second “config” directive to the existing analytics code.
i) First, go to the backend of the website, where you can make changes to the source code.
ii) Search for Global Site Tag in the code.
iii) Add an additional “config” directive having GA4 Property “Measurement ID” just after UA Config in line number 12 and before .
In Conclusion Using and navigating Google Analytics programs can be complicated. Ultimately though, they can help you get in-depth insights into the behaviors of your users and the effectiveness of your digital marketing. You may not want to jump right into GA4 without using the more completed, more familiar UA first. Or, if you do want to start using GA4, you might find some value in using both programs alongside each other first. If you need technical help navigating the new GA4 account or migrating your tags and data from UA to the new GA4, OpenSource Technologies, a leading digital marketing company with GA4 Certified Experts, is ready to help.